

Hello everyone, recently a friend challenged me to make a dust plug wolf for her younger brother. This challenge inspired this blog post, and here we go! A tutorial on how to make your own wolf out of polymer clay!
Before you start it's handy to have the right equipment (it's a pain to have to stop half way!);
~Grey Polymer Clay (or any other colour if you choose),
~A craft Knife (Exacto knife),
~ Any other tools that may help,
~A range or white, black, and dark brown acrylic paints,
~Plastic Dust plug (if this is what you want).
Let's begin!!
To start take your ball of grey clay (1) and half it, we will use the second ball later(2). We are going to begin with the front of the body (head and front legs). Take your ball and roll it on one side (3).
This should leave you with a semi circular shape at the top and a slightly oblong shape at the bottom. Then mould the clay into two ears and a nose by pushing and pressing the clay into place(4).

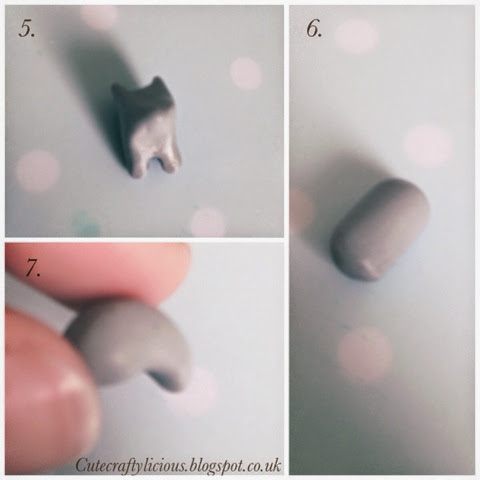
Once you have your main body shape cut, using your craft knife, a triangle- this will make the front legs (5). You have now finished the front of the Wolf's body. Take your second ball of clay and roll into a flat sausage shape (6). Then slightly curve the clay to create the back legs(7).
(click on the images to enlarge)
Next cut another- slightly larger triangle to create the back legs. To make the bushy tail, roll out an excess piece of clay and roll one side thinly (8). Next add onto the back end of the body (9). You have now finished the basic modelling of your wolf now add both parts together (10).

Next paint like in the very first picture using a fine brush and acrylics. Remember to make the brush strokes look like fur, for added effect! Hope you enjoyed this tutorial! Keep the Creative juices flowing!x
Please post a comment if you enjoyed and follow me on my social media, Links below;
Follow Me on Google+
Follow Me on Bloglovin'
Follow Me on Twitter
No comments:
Post a Comment